Our guides
Get started
This section is probably the most interesting for most readers as it describes the installation of the Cypherium miner on a Linux operating system, for this section I’ve used Ubuntu 20.04 since its one of the most commonly used Debian based Linux distributions. Note that it is advised to read the guide from top to bottom without skipping any steps (don’t worry there aren’t that many) if a step is optional, it will be marked as such. Each step contains a “code” section where you can copy and paste the commands to your terminal and, in some cases a screenshot to provide a little bit extra guidance (you probably won’t need it 😉).
Well… lets start!
Port forwarding
The Cypherium miner requires access to a publicly accessible IP address (reachable for clients connected to the internet) for a couple of ports. In most cases this is the IP address you get from your Internet provider, however each device in your LAN (Local Area Network) has its own IP address.
So what we need to do is to map a couple of ports from your WAN (Wide Area Network aka the Internet in this context) to the IP address of your local system that is hosting the miner program, this is called Port Forwarding.
The first thing you will need to do is figure out what the local IP of your system hosting the miner is (if you connect to the system with SSH then you probably know the IP address already)
hostname -I
And now for the tricky part, (that depends on your local network setup) you will need to forward the following ports:
					Port 6000 for protocol TCP and UDP
Port 7100 for protocol UDP
This is something you can (typically) do in the modem/router of your provider.
Please make sure to only expose the ports you need to expose so don’t activate a DMZ or something else that fully exposes your system to the Internet.
Install required packages for Linux or macOS
Before we can run the cypherium miner we need to take care of some prerequisites, these depend on your OS so continue at the appropriate section.
Linux
If you are using Linux, we need to install two packages being git (required to pull in the miner) and openssl.
Note there is a very good chance you already have one or more installed.
					sudo apt install openssl
sudo apt install libssl-dev
sudo apt install git
macOS
If you are using macOS, we need to install git in order to pull in the Cypherium miner and we will install brew as a convenient way of installing openssl and gmp. Installing git can be done in several ways, however one of the easiest is by installing xcode (this will also install some very convenient command line tools).
Note there is a very good chance you already have xcode installed.
					xcode-select --install
/bin/bash -c "$(curl -fsSL https://raw.githubusercontent.com/Homebrew/install/HEAD/install.sh)"
brew install openssl@1.1
ln -s /usr/local/opt/openssl/lib/libssl.1.1.dylib /usr/local/lib/
ln -s /usr/local/opt/openssl/lib/libcrypto.1.1.dylib /usr/local/lib
brew install gmp
brew link gmp
Create a new user
The Cypherium installation guide assumes the miner is allowed to run with root privileges (root user) however, since we like to adhere to best practices we will start with the creation of a new user having limited privilege’s.
* Note that I’ve chosen to use cypherium as my new user it can be anything you like of course, just make sure to replace cypherium with you own choice. Also note that I’ve added the cypherium user to the sudoers group, this is just for convenience.
					sudo adduser cypherium
sudo usermod -aG sudo cypherium

Make sure to choose a safe password and optionally enter a name, room number, phone numbers
Download the miner
Now it’s time to download the mining software on our system. Well we are actually going to “clone” the CypherBFTBin project from GitHub, being the compiled version of the CypherBFT project.
However, the first thing we need to do is to switch over to our newly created user cypherium
					sudo su - cypherium
git clone https://github.com/cypherium/cypherBFTBin.git
Modify the resetStart.sh script to support non root operation
					cd cypherBFTBin
nano resetStart.sh
Lets perform a small tweak on one of the scripts in order to support non root operation.
Its just 2 simple lines (1 and 42 highlighted) that need to be changed.
					#!/bin/bash
GENESISDIR="./genesis.json"
OUTPUTLOG="cypherlog.txt"
ostype()
{
  osname=`uname -s`
  #echo "osname $osname"
  OSTYPE=UNKNOWN
  case $osname in
     "FreeBSD") OSTYPE="freebsd"
     ;;
     "SunOS") OSTYPE="solaris"
     ;;
     "Linux") OSTYPE="linux"
     ;;
     "Darwin") OSTYPE="darwin"
     ;;
     "linux") OSTYPE="linux"
     ;;
     "darwin") OSTYPE="darwin"
     ;;
     *) echo "other system $osname"
     ;;
    esac
  return 0
}
ostype
select=$2

CHAINDB="./$OSTYPE/chaindb"
BINDIR="./$OSTYPE/cypher"
if [[ -n "$select" && "$select" == "test" ]];then
        BINDIR="./$OSTYPE/cyphertest"
        CHAINDB="./$OSTYPE/chaindbtest"
        GENESISDIR="./genesistest.json"
        OUTPUTLOG="cypherlogtest.txt"
fi

#echo "CHAINDB $CHAINDB"
#echo "BINDIR $BINDIR"

rm -rf $CHAINDB/cypher* $OUTPUTLOG
$BINDIR --datadir $CHAINDB init $GENESISDIR
./start.sh $1 $2
Modify run.sh to enable admin commands
This is an optional step, however if you want to be able to execute admin commands in JSON-RPC mode, you will need to modify the run.sh script. Dont worry its very simple!
nano run.sh
All the way down on line 70 and 72 search (scroll to the right) for
–rpcapi cph,web3c,personal,miner,txpool,net
and add
,admin
so you will end up with
–rpcapi cph,web3c,personal,miner,txpool,net,admin
					#!/bin/bash
BOOTDIR="./bootnode.txt"
OUTPUTLOG="./cypherlog.txt"
LOGLEVEL=4
bootnode_addr=cnode://"$(grep cnode $BOOTDIR|tail -n 1|awk -F '://' '{print $2}')"

IPENCDISVALUE=1
CONSOLEMODE="--console"
BACKENDMODE="--backend"
CLIMODE=$CLISILENTMODE

if [[ "$1" != "" ]];then
   CLIMODE=$1
fi

ostype()
{
  osname=`uname -s`
 # echo "osname $osname"
  OSTYPE=UNKNOWN
  case $osname in
     "FreeBSD") OSTYPE="freebsd"
     ;;
     "SunOS") OSTYPE="solaris"
     ;;
     "Linux") OSTYPE="linux"
     ;;
     "Darwin") OSTYPE="darwin"
     ;;
     "linux") OSTYPE="linux"
     ;;
     "darwin") OSTYPE="darwin"
     ;;
     *) echo "other system $osname"
     ;;
    esac
  return 0

}
ostype
CHAINDB="./$OSTYPE/chaindb"
BINDIR="./$OSTYPE/cypher"
RNET_PORT=7100
P2P_PORT=6000
RPC_PORT=8000
select=$2
GENESIS_FILE="genesis.json"
if [[ "$select" == "test" ]];then
        BINDIR="./$OSTYPE/cyphertest"
        CHAINDB="./$OSTYPE/chaindbtest"
        OUTPUTLOG="cypherlogtest.txt"
        GENESIS_FILE="genesistest.json"
fi

echo "CHAINDB $CHAINDB"
echo "BINDIR $BINDIR"
killall -9 cypher
killall -9 cyphertest
NetWorkId=`less $GENESIS_FILE|awk -F "[:]" '/chainId/{print $2}'`
NetWorkId=`echo $NetWorkId | cut -d \, -f 1`
ip=`curl icanhazip.com`
echo "ip: $ip"
echo "bootnode address: $bootnode_addr"
echo "Client print mode:$CLIMODE,please wait for some seconds!"
if [[ "$CLIMODE" == "$CLISILENTMODE" || "$CLIMODE" == "0" || "$CLIMODE" == " " ]];then
   # Add admin to --rpcapi
   nohup $BINDIR --nat=extip:$ip --ws   -wsaddr="0.0.0.0" --wsorigins "*" --rpc --rpccorsdomain "*" --rpcaddr 0.0.0.0 --rpcapi cph,web3c,personal,miner,txpool,net,admin --rnetport $RNET_PORT --port $P2P_PORT --rpcport $RPC_PORT --verbosity $LOGLEVEL --datadir $CHAINDB --networkid $NetWorkId --gcmode archive --bootnodes $bootnode_addr --mine   > "$OUTPUTLOG" 2>&1 &
else
         $BINDIR --nat=extip:$ip --ws   -wsaddr="0.0.0.0" --wsorigins "*" --rpc --rpccorsdomain "*" --rpcaddr 0.0.0.0 --rpcapi cph,web3c,personal,miner,txpool,net,admin --rnetport $RNET_PORT --port $P2P_PORT --rpcport $RPC_PORT --verbosity $LOGLEVEL --datadir $CHAINDB --networkid $NetWorkId --gcmode archive --bootnodes "$bootnode_addr" --mine console
fi
Miner operation (JS Console or RPC)
Just a quick sidenote, the miner can be operated in two different modes being:
– JS (Java Script) Console mode, where the miner remains active and displays all events on the screen allowing for direct interaction.
(Note that this mode does not log events to the cypherlog.txt logfile)
– RPC mode where the miner runs in the background allowing for RPC interaction, for example with the command line tool curl or any other script or programming language that you might want to use.
So what mode of operation should you use? I personally prefer RPC mode, however if you are getting started JS Console mode does provide you with the feedback you probably want to have.
The miner can be started in either JS Console or RPC mode by respectively appending a 1 or a 0 to either start.sh or resetStart.sh for example
./resetStart.sh 1
will start the miner in JS Console mode
Sync the miner
The first time you start the miner you will need to sync the chain (essentially download the blockchain to your local system) its probably the essayist to use JS Console mode for this by issuing:
./resetStart.sh 1
(Note that the same can be done by running ./resetStart.sh 0 and tailing the log with tail -f cypherlog.txt in order to see what the miner is doing.)
Now wait until the miner is fully synced, it’s synced when the list of blocks stops scrolling over the screen (well it doesn’t stop it’s just slower).
./start.sh 0
./start.sh 1
Create an account
After the miner has synced it’s time to create an account, since we are still in console mode issue the command below, replace secret with a secure password!
personal.newAccount("secret")

The miner generate a new BLS (Boneh–Lynn–Shacham) key pair and presents you with the public key, address and encoded address.
Note that I used “secret” as my password, don’t do that 
Lets check our current personal account to be sure
personal.listAccounts

Great! everything seems to be in order!
Check your new account
Lets check the balance for our account, note that we are using the address from our newly created account starting with a 0x since its a very large hexadecimal number.
cph.getBalance("0xb01a2aee90fb20611f963475a17f2a738b9988aa")
And that’s our current balance, 0 not very surprising since we haven’t started mining yet.
Start mining
Everything is ready to start mining, so let’s start the miner, note that we need to supply the number of threads the miner can use, the hexadecimal address and the password between quotes.
miner.start(1,"0xb01a2aee90fb20611f963475a17f2a738b9988aa", "secret")
Check miner status
Lets check the miners status, there are a couple of possibilities being
miner.status()
When you first start the miner, it probably displays the status common node, just wait a while before it gets into the committee.
Stop the miner
Probably not something you want to do often, however in order to stop the miner just issue
miner.stop()
The Menu script, Operating the miner the easy way
For normal day day operations I personally prefer something a bit more convenient so I’ve made a small and simple Batch script that displays a menu with some basic miner operations.
Note that line one is only required if you need to update the menu.sh script to a newer version (I do plan on making new versions with more functionality)
The second line installs some packages that can help you with connectivity tests (to check if your ports are forwarded correctly)
					rm menu.sh
sudo apt install libgmp-dev jq netcat nmap
wget https://raw.githubusercontent.com/segmentationsingularity/cypher/master/menu.sh
chmod +x menu.sh
Lets start the menu
./menu.sh
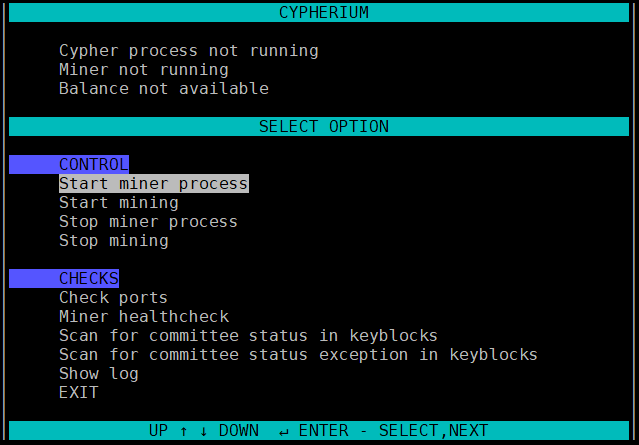
As can be seen from them menu header, the miner process is not running, start it by selecting the first option (Start miner process) and press enter, after waiting 10 seconds press enter again.

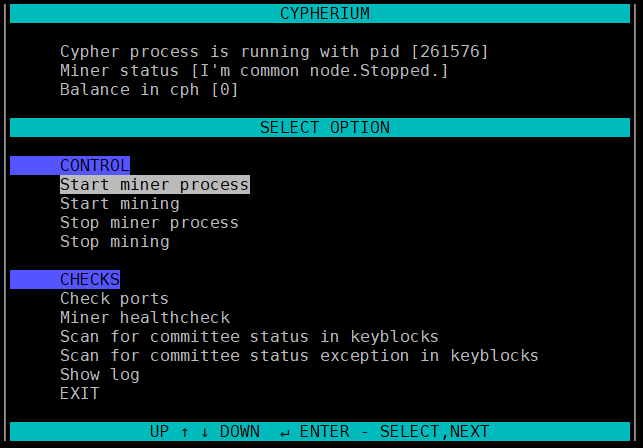
The miner process is running, however not mining, select the second option (Start mining) and enter your password when prompted.

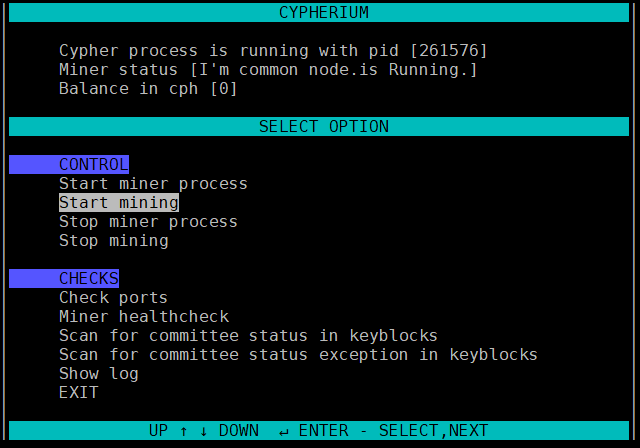
Well that’s it, the miner is running!
Note that selecting EXIT wont stop the miner, it keeps running in the background (its started in RPC mode) when you want to control it, just start the menu script again.